Installing a transparent LED display is a precise engineering job. It demands a balance between structural stability, thermal management, and visual quality.
Traditional solid LED walls use heavy steel frames and block daylight. Transparent displays are different. They use lightweight aluminium structures and highly open panels. This design preserves the look of glass facades while adding digital content.
A good installation depends on thorough site preparation, correct mounting, and hidden cable routing. This article covers the whole process: site survey, mounting selection, step‑by‑step assembly, common mistakes, testing, and maintenance.

Correct site preparation avoids expensive rework and structural failures. Before you install any hardware, you must check three things: the load capacity of the mullions, the power supply, and the right mounting method.
A full site survey is essential. Modern transparent panels are light. They weigh about 12 kilograms per square metre.
However, you still need to calculate the total load on ceiling beams or vertical mullions. Include dead weight, dynamic forces, and, for outdoor projects, wind pressure. Long term safety depends on accurate calculations.
Power planning is as important as structural checks. High‑brightness displays that work in direct sunlight consume a lot of electricity.
Your electrical subpanels must handle peak loads with a 20 percent safety margin. Signal cables must run in dedicated pathways. Keep them away from equipment that creates electromagnetic interference, such as HVAC drives and elevator motors.
The right mounting framework depends on the building layout.
Ceiling suspension keeps the floor area free. It works well for window displays and event spaces.
Curtain‑wall mounting fixes the screen directly to structural window frames. This is a permanent solution for large lobbies, conference centres, and commercial projects.
Frame mounted installations work best for heavy duty glass curtain walls. Structural aluminum profiles attach directly to vertical building mullions, providing a rigid chassis that supports large screen arrays while maintaining wide viewing angles.
| Screen Category | Typical Transparency | Primary Mounting Method | Ideal Application Environment |
| Standard Front Lit | 60% to 75% | Structural Frame Mounting | Large Glass Curtain Walls |
| High Efficiency Side Lit | 75% to 85% | Bracket or Hanging Rig | Sunlit Storefront Windows |
| Holographic Film | 90% to 95% | Direct Adhesive Bonding | Interior Glass Partitions |
Suspension setups utilize load tested top hanging bars attached to overhead structural steel. Individual cabinets interlock vertically using integrated tension latches, enabling rapid assembly without requiring permanent modifications to the building interior, which is ideal when setting up a Rental LED Display system.
Adhesive film installations use frameless invisible substrates that bond directly to indoor glass surfaces. This lightweight technique eliminates bulky support hardware entirely, delivering high transparency while displaying clear visual content.
Once the primary mounting method is chosen, installers must execute the physical assembly sequence with precise mechanical tolerances.
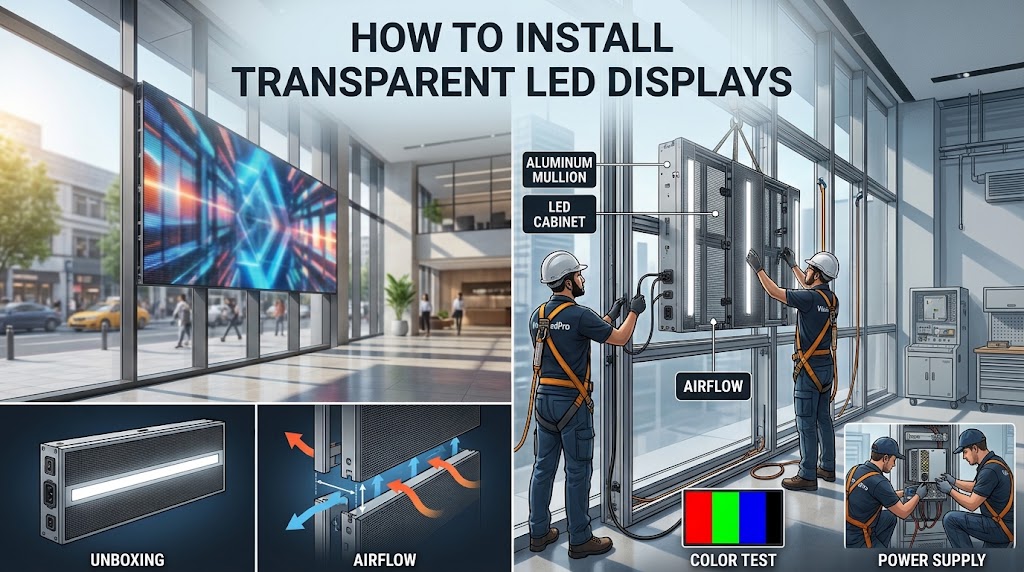
Proper handling during unboxing prevents accidental damage to exposed circuit boards. Installers should inspect each panel on a clean surface, verifying that the linear light strips remain straight and that all power connectors are intact before hoisting panels into place.
Secure Hanging Beam and Floor Base: Secure the hanging beam and floor base directly to the screen frame structure.
Hoist Top Row: Use steel cables to hoist the top row of the screen, fixing it to the overhead ceiling structure.
Connect Screen Panels: Align adjacent screen panels and firmly fasten them together using screws.
Power and Signal Connections: Connect the main Power In lines and Signal In loops through the designated frame pathways according to the wiring diagram.
After securing the mechanical locks, run power lines through the side structural profiles to keep wiring completely hidden from view.
With the physical structure locked in place, avoiding common engineering mistakes during cable routing and thermal planning is essential for long term operation.
Installing screens directly behind glass facades creates heat management challenges. Solar radiation passing through glass panels increases ambient temperatures quickly, making an airflow gap of at least fifty millimeters necessary to allow natural heat dissipation.
Visible cable trays degrade the visual appeal of a transparent display. All main alternating current power feeds and main signal cables should run inside the perimeter structural mullions or hollow support profiles rather than across the open grid.
Overloading single power circuits leads to voltage drops and unexpected breaker trips during peak brightness output. Distributing electrical loads evenly across separate dedicated circuits prevents current spikes and protects sensitive receiving cards, especially on a high nits Outdoor LED Display.
Resolving thermal and wiring constraints ensures smooth operational testing and simplifies routine maintenance procedures.
Initial power application should follow a systematic testing sequence to verify electrical integrity. Technicians must check input voltages at terminal blocks before powering on the main sending controllers and applying video signals.
Running solid red, green, blue, and white test patterns helps identify dead pixels or signal transmission errors across individual modules. Setting up automated brightness control sensors adjusts display output based on ambient light, protecting light emitting diodes from overheating during bright afternoons.
Power on the main control unit and verify correct voltage at the distribution panel.
Load single color test patterns to check pixel uniformity and signal stability.
Configure control software to match the physical cabinet layout.
Set ambient light sensors to automatically adjust nit levels throughout the day.
When system issues occur, the modular design allows quick troubleshooting by replacing specific core components (LED modules, power supplies, or receiver cards) without replacing the whole display:
LED Module Replacement: Required when encountering black patches on the screen, single unlit rows/columns, or localized color/brightness distortion.
Power Supply Replacement: Required if the screen exhibits flickering or random rebooting.
Receiver Card Replacement: Required if the screen stays completely dark while the power LED remains on, or if signal cable checks fail to clear display glitches/scrambled images.
Total project costs depend on pixel pitch, overall screen dimensions, nit brightness specifications, and the complexity of the custom support framework. Higher resolution displays with smaller pixel spacing require more light emitting diodes per square meter, which increases component costs. For accurate pricing based on your specific architectural requirements, contact our engineering team directly through our official website at VisionLedPro.
Yes, display modules can be manufactured with flexible circuit boards and angled frame connectors. This design allows the screen array to follow smooth architectural curves without creating visible gaps between adjacent panels.
Using non anodized aluminum or standard steel frames near outer glass walls leads to corrosion from condensation. Professional installations utilize structural extruded aluminum alloys with protective anodized coatings to withstand moisture and heat buildup.
High quality displays built with premium components deliver an operational lifespan of up to one hundred thousand hours. Operating the screen within recommended temperature ranges and using automatic brightness control preserves diode efficiency over time.
Deploying a high performance transparent display successfully relies on rigorous site preparation, precise structural alignment, and effective cable management. By maintaining proper ventilation gaps, balancing electrical loads, and selecting the correct mounting framework, commercial properties can turn ordinary glass windows into functional visual media.
Investing in well engineered display hardware backed by strict quality standards guarantees reliable uptime and long term visual performance. To discuss your upcoming architectural installation or request detailed technical specifications for your space, reach out to the technical team at VisionLedPro today.



 Tel: +86-134 2792 1400
 Email: led@visionledpro.com

Address: Second Industrial Park,No. 28, Xintang Road, Fuhai Street, Baoan District, Shenzhen,CHINA
Copyright © 2020 Shenzhen Vision Pro Electronic Co., Ltd All rights reserved.

By continuing to use the site you agree to our privacy policy Terms and Conditions.